To contribute to this wiki, please contact bikebikeeverywhere@gmail.com if you would like us to create you an account. The Contribute to this Wiki page goes into detail about how to make contributions and what information should be included.
Para contribuir a este wiki, por favor escribe a bikebikeeverywhere@gmail.com si deseas que creemos una cuenta para ti. La página Contribute to this Wiki explica en detalle cómo hacer contribuciones y qué información debe incluirse.
Bike Evaluation

Evaluating a bike for sale, stripping, or scrap. Bikes to be tuned for sale should be evaluated first for fatal frame damage or major repair needs that would mean they should be stripped for scrap or rebuilding.
Step 1: Inflate the Tires
Start by pumping the tires up; it will make the bike easier to handle, and be helpful whatever the evaluation finds: the tubes won’t get damaged, and we can find out if they hold air.
Step 2: Frame/fork damage
Check for crash damage to frame and fork: Front crash signs: a bent fork (with one eye closed, sight down the front wheel from above the stem, the handlebars should align with the front dropouts and the stem should be centered in the hub). More likely (and easier to spot), the top and/or down tubes may have cracked paint on the top side, or be rippled on the underside just behind headtube.

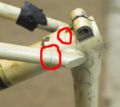
Here is a picture of a mildly crashed bike. This bike can still be ridden safely, but we wouldn't want to sell it.

Here is a more serious crash, which would make the bike scrap. Anything as bad as this or worse is fatal.

Bikes that have been hit from the side (usually by a car while parked in the garage) may have bent handlebars, cranks, wheels, or most fatally, rear stays (sight down each stay to look for differences).
Aluminum frames are particularly prone to cracks - here is an example.


Other crash indications: if the seat and/or bar tape or grip on the right side are badly torn, and/or the right pedal or especially the rear derailer is scraped on the outside, this is a sign to look for a bent rear derailer hanger (on better bikes this is part of the frame), which can sometimes be seen by sighting along the derailer pulleys to check that they are parallel with the sprockets.
Step 3: Other possibly fatal flaws
Check for:
- missing or damaged parts,
- badly out-of-true wheels,
- extensive rust.
Generally, the cheaper the bike, the higher our standards are. It is useful to have a “not sure” pile for re-evaluation later.
Step 4: Stem/Seatpost
Frozen stem or seatpost are checked next.
1. If first evaluation is OK: Loosen the seatpost binder and remove the seatpost from the seat tube (gain leverage by standing over the rear wheel, placing one foot on a pedal in the down position, and twisting the seat while pulling up). If it comes out, grease the binder bolt and inside of the seat tube and reinstall and tighten the post with the max. ht. line just visible.
2. For threaded headsets, loosen the stem bolt (stand with front wheel between your knees, loosen the stem bolt 5 turns or so and tap it down with a hammer, if needed) and pull the quill out of the fork steerer tube. Grease the stem bolt threads and inside of the steerer tube, and reinstall and tighten the stem with the max. ht. line just visible.
Step 5: Pedals
If the pedals are damaged (broken, bent, or very wobbly or rusted), remove them: They are on tight, so use the right wrench, and be careful of smashing your fingers between the wrench and the bike. Hold the wrench all the way at the end, and try pushing down on it while you lean over the bike from the other side, so it doesn't roll away from you. The left pedal (on the left side when you sit on the bike) is left-hand threads, so turn it clockwise to loosen. The right pedal is right-hand thread so turn it counter-clockwise to loosen. Liquid Wrench may help.
Step 6: Completion
If the seatpost, stem and pedals are OK, write your name and the bike’s serial number and any minor needs you have noticed on a worksheet strapped to the handlebars. If there are fatal flaws write those on the sheet, or just put the bike in the appropriate pile.
Proceed to Tune-up